What is G suite inbox zero?
Inbox Zero is a rigorous approach to email management aimed at keeping the inbox empty — or almost empty — at all times.
This article shows how to organize your inbox when using email in G suite. This technique can also apply to free Gmail accounts. However, as we are using G suite for business, I keep using the term G suite as below.
By default, G suite will put all emails into one inbox. If you are a person like me, receiving around 500 emails every day, you will spend the whole day only for processing your inbox. Luckily, G suite supports for labels, that can help us to organize our inbox much better, aiming to inbox zero.
What are labels in G suite?
If you think your inbox as a folder, labels can work like sub-folders. In G suite, you can create multiple labels, independent or parent-children relations. For example, I have created first labels for my startups: VietNAP and OsloNAP. These two labels are independent. Under each, I have created different labels for different purposes. For example, my employee names, my vendors. Here are the steps.

- Login email at G suite, of course.
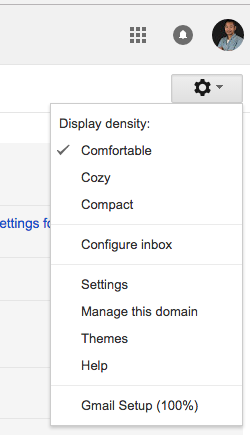
- Click the configuration button near to the top right corner.
- Click Settings, then Labels.
- By default, G suite has created few labels there, including System labels and Categories. Scroll down, in the Labels section, you will have a button Create new label. Click that button.
- Enter the name of your label. Any unique name that you can remember and related to what you are going to assign to emails.
- If you just want to create a top-list independent label, don’t choose Nest label under.
- If you want to create a parent-child label, use Nest label under, and choose another label in the dropdown box.
- Repeat above steps for creating a new one.
Applying filters to make G suite inbox zero
After creating labels, you can come back to the Settings screen, but this time, click Filters and Blocked Addresses – Create a new filter.
For basic usage, you have several options such as filtering by a sender, a receiver, words in the subject or email content… Click to Create filter with this search.
- Choose Skip the Inbox (Archive it). This will keep the filtered messages away from your inbox.
- Next to Apply the label, choose the label you want to assign to the emails.
- If your filter is correct, and you have some email messages fit to the filter, you should see them now together. You might want to choose Also apply filter to 0 matching conversations. when creating a filter.
- There are other options such as Mark as read, Forwarding, etc. It depends on how you are using.
For advanced usage, you can combine multiple information. G suite supports for different operators, that you can use for search in your inbox, and create filters with that. For example:
- I want all emails from Norwegian Air, SAS, KLM, Airbnb labeled as Travel. I can create a filter like this:
[div class=”reference”]from:(norwegian.no) OR from:(klm.com) OR from:(flysas.no) OR from:(airb
- I want all reports from my accountant labeled as Billing. I can create a filter like this:
[div class=”reference”]from:(my-accountant-email) AND subject:(Weekly billing report)[end-div]
It might take you one or two hours for creating filters, but it worths. You will be much more productive with a zero inbox.
